Thursday, July 18, 2013

Savoury : Gyoza (Japanese dish)

Ok... it has been ages since I updated this blog.. I've been too caught up with my children's activities that I have very little time for myself.

Anyway, I would like to share a favourite recipe of mine.. a recipe which my children love.. GYOZA.

Normally, we'd have GYOZA at Japanese restaurants but they are costly, especially when you have 5 children who eat a lot! So, I decided to learn how to make GYOZA and when I have the time, I'd make them for the children. :)


GYOZA (餃子)

400 gm minced chicken
300 gm minced prawn
half a cabbage (finely chopped)
6 stalks of spring onion/scallions (finely chopped)
1 onion (finely chopped)
1 bulb of garlic, peeled and finely chopped
1 inch of ginger (grated)
1 tbs sesame oil
3 tbs oyster sauce
5 tbs light soy sauce
1/2 tsp salt (optional)
1 tsp pepper
2 tbs sugar (optional/as desired)
2 tbs potato starch


Bought at Tesco and HALAL.


Japanese Gyoza Pastry bought at Tesco

Potato Starch


In a bowl, place the minced chicken and prawn, pepper, salt, sugar, sesame oil, oyster sauce, potato starch and soy sauce.

Add the cabbage, spring onion, garlic, onion and ginger and mix them well.


Place a spoonful of gyouza mixture on the gyouza pastry.

Wet the side of the pastry with water.

Starting from one end, over lap the pastry with 1 cm gap in between.


TA DA!! This is how it should look like!


Sprinkle your container with some potato starch to prevent the gyouza getting stuck on it.


Heat your pan, and wipe some oil.  Place the gyouza.

Pour some boiling water until 3/4 of the gyouza is covered with it.  Put 1/2 a tsp of sesame oil in the pan.  Cover it and wait until the water has drained and the bottom of the gyouza is brownish.


Ready to be eaten with Japanese Sesame Soy Sauce


Here's a short video on how to 'fold' the gyoza pastry.


Tuesday, May 24, 2011

Dessert : Apple Strudel (Strudel Epal)


Serves 8 -10 (Untuk 8-10 orang)

Ingredients : (Bahan-bahannya :)
500gm filo pastry, thawed if frozen (500gm pastri filo, dinyah bekukan sekiranya beku)
115gm or ½ cup unsalted butter, melted (115gm atau 1/2 cawan mentega tanpa garam yang dicairkan)
icing sugar for dusting - optional (gula 'icing' untuk hiasan - jika suka)

Filling : (Inti : )
1kg cooking apples, peeled, cored and sliced (1kg epal untuk memasak, dikupas, dibuang tengah dan dihiris)
115gm or 2 cups fresh white breadcrumbs (115gm atau 2 cawan serbuk roti putih segar)
150gm or ¾ cup granulated sugar (150gm atau 3/4 cawan gula halus)
1 tsp cinnamon (1 sudu kecil serbuk kayu manis)
75gm or ½ cup raisins (75gm atau 1/2 cawan anggur kering)
finely grated rind of 1 lemon (parutan sebiji kulit lemon)
50gm or ¼ cup butter (50gm atau 1/4 cawan mentega)


Method : (Caranya :)

1) Preheat the oven to 180 degree celcius. (Panaskan ketuhar sehingga 180 darjah selsius.) 

2)To make the filling, place the sliced apples in a large mixing bowl. (Untuk membuat inti, masukkan hirisan epal ke dalam sebuah mangkuk yang besar)
     
3) Add the breadcrumbs, sugar, cinnamon, raisins and grated lemon rind and mix well. (Campurkan serbuk roti, gula, serbuk kayu manis, anggur kering dan parutan lemon dan gaul rata)

4) Melt the butter in a small pan, then stir it into the mixture. (Cairkan mentega di atas api dan campurkan kepada bahan-bahan diatas dan gaul rata)


5) Lay a sheet of filo pastry on a lightly floured work surface and brush with a little melted butter. (Bentangkan sehelai pastri filo diatas meja yang bersih dan yang telah ditaburi tepung terlebih dahulu.  Sapukan mentega cair) 

6) Place another sheet on top and brush with melted butter as before. (Tindihkan sehelai lagi pastri filo diatas pastri tadi dan sapukan mentega cair lagi)

7) Continue stacking the sheets and brushing with the butter until there are four or five layers in all. (Teruskan menindih helaian pastri filo dan sapukan mentega cair sehingga 4-5 lapisan)

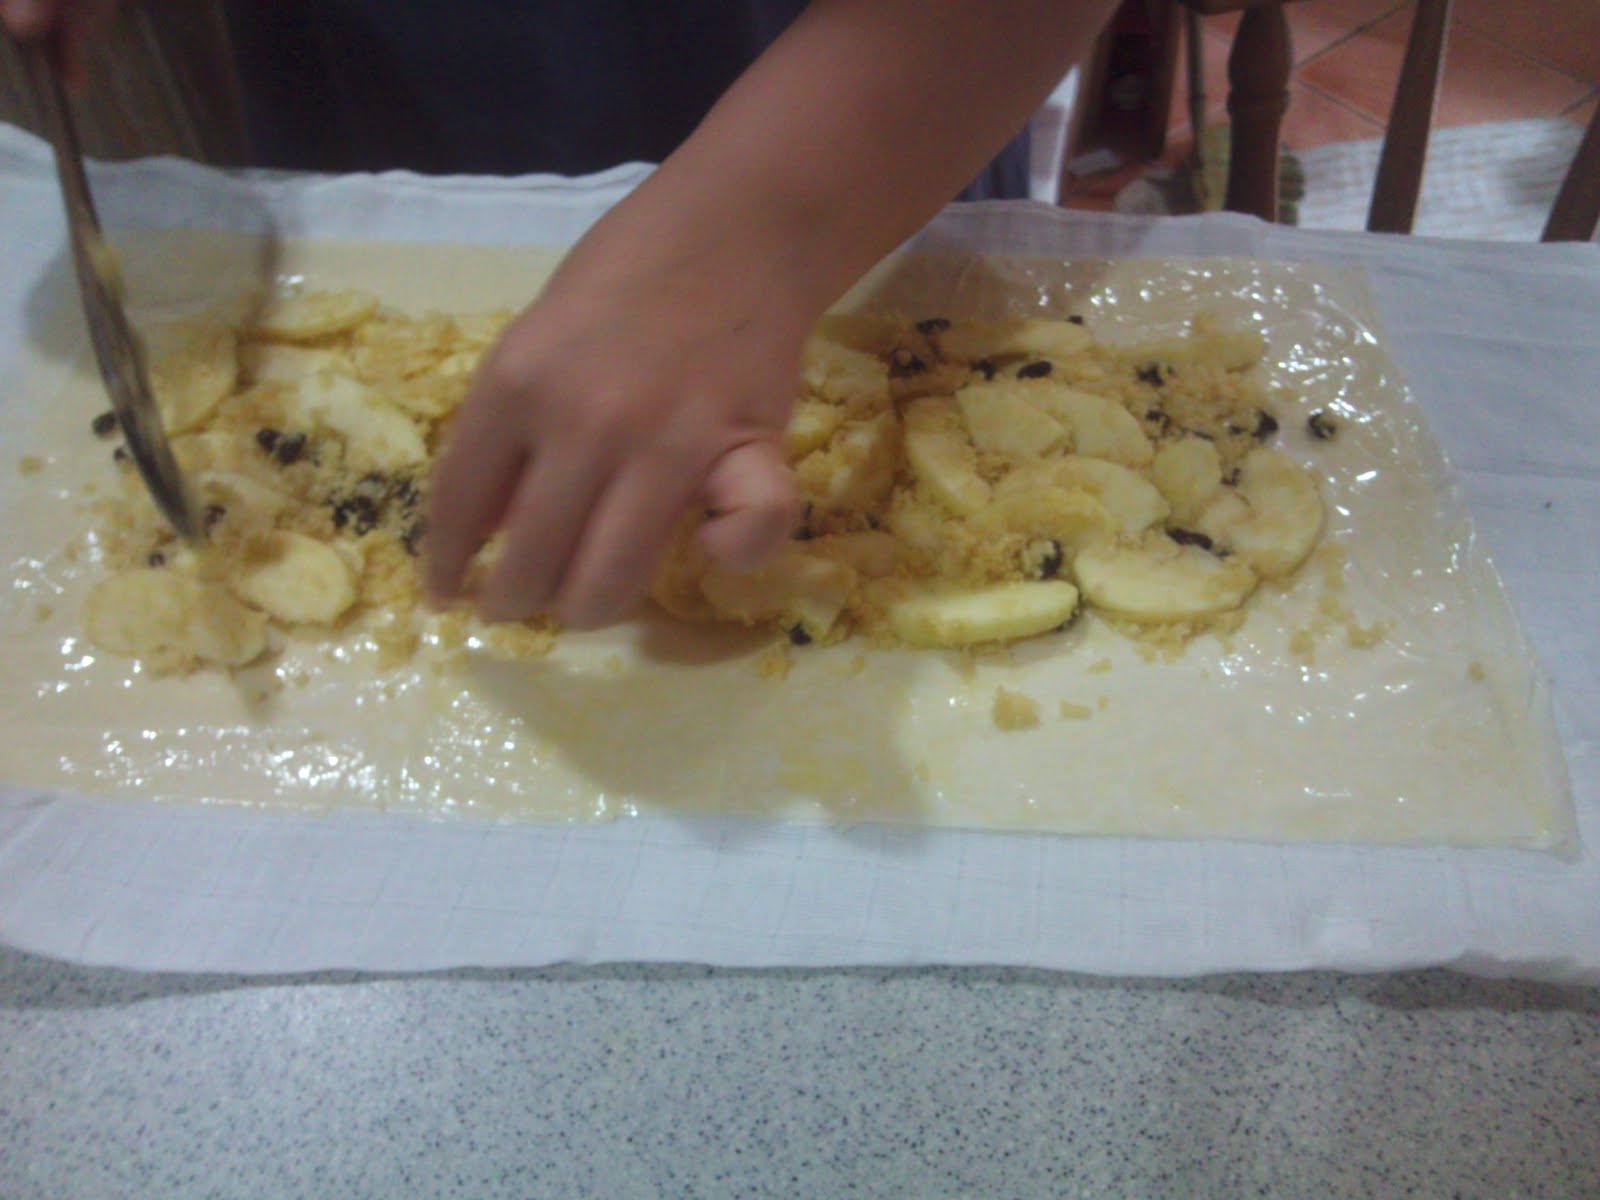
8) Spoon the filling into the centre of the pastry, leaving a 2.5cm/1in border all round. (Sendukkan inti ke tengah-tengah pastri dan tinggalkan 2.5cm / 1 inci di sekeliling pastri tersebut)


9) Fold in the two shorter sides, then roll up from one long side, Swiss-roll (jelly-roll) style. (Lipatkan sisi yang pendek ke dalam, dan gulung dari sisiyang panjang seperti kek 'Swiss-roll')


10) Place the strudel on a lightly buttered baking sheet, seam side down. (Letakkan strudel tersebut diatas kertas minyak / 'baking sheet' yang telah disapu dengan sedikit mentega.  Pastikan bahagian yang terbuka diletakkan di bahagian bawah)


11) Brush the pastry with the remaining melted butter. (Sapukan keseluruhan pastri dengan mentega cair)


12) Bake for 30-40 minutes, or until golden. (Bakar selama 30-40 minit atau sehingga keperang-perangan)


13) Remove the strudel from the oven and place on a wire rack to cool.  (Keluarkan strudel dari ketuhar dan letakkan di atas rak dawai penyejuk)


14) Dust with icing sugar before cutting into slices for serving. (Ayak sedikit gula 'icing' di atas pastri sebelum dipotong untuk dihidang, jika suka)


Variation : (Variasi :)
For extra crunch in the strudel filling, add 75gm or ¾ cup lightly toasted, chopped hazelnuts or almonds. (Untuk lebih rangup, tambah 75gm atau 3/4 cawan kacang hazel atau badam yang telah dicincang dan dibakar sedikit)


If you have any problems with this recipe, please do not hesitate to contact me @ aznorskitchen@gmail.com. (Sekiranya anda mengalami sebarang masalah dengan resepi ini, sila hubungi saya di aznorskitchen@gmail.com)

Sunday, May 22, 2011

Dessert : Strawberry Trifle

A long, long time ago (yesss... almost 2 decades ago)... when i visited my friend, Farah in UK, she made me this dessert. I brought some instant ones back to Japan, and have been making strawberry trifle ever since..  
(Bertahun-tahun dahulu (ye.... dah hampir 2 dekad yang lalu), sahabat baik saya, Farah telah membuat strawberry trifle ni untuk saya ketika saya pergi melawatnya di UK.  Kerana keenakkannya itu, saya telah memborong beberapa bungkus strawberry trifle segera untuk dibawa pulang ke Jepun dan sejak itu saya selalu membuat pemanis mulut ini)


It's really simple and I hope that you will try it out.
(Ia amat mudah dan saya harap anda semua akan mencuba resepi ini)


Ingredients :
(Bahan-bahannya :)


Lady finger biscuits / sponge biscuits / sponge cake cut into small pieces
(Biskut jejari / biskut span / bahulu / kek span yang dipotong kecil)


1 packet of instant strawberry flavoured crystal jelly
(1 paket jeli kristal segera berperisa srawberry)


2 tbs instant custard powder (I use Bird's Brand)
(2 sudu besar tepung kastard segera, saya guna jenama Bird's)


570 ml / 1 pint of milk
(570 ml / 1 pain susu)


1-2 tbs sugar
(1-2 sudu besar gula)


1 cup of whipping cream
(1 cawan 'whipping cream')


Some colourful toppings (optional)
(Sedikit 'topping' penghias jika mahu)


Method :
(Caranya :)


1) Place ladyfingers biscuit in a container.
( 1) Susun biskut jejari ke dalam bekas)


2) Follow the instructions on the box of the crystal jelly.
( 2) Masak jeli kristal mengikut aturan yang tertulis dibelakang kotaknya)


3) Pour the hot mixture of crystal jelly into the container lined with lady fingers. Leave to cool for 30 minutes - 1 hour.
( 3) Tuangkan jeli yang panas ke dalam bekas yang berisi biskut jejari.  Biarkan sejuk selama 30 minit - sejam.


4) In the meantime, make the custard. Put the custard powder and sugar into a basin and mix smoothly with 2 tablespoon of milk taken from a 570ml. Put the rest of the milk in a saucepan and heat it to almost boiling. When nearly boiling, pour the hot milk onto the mixed custard in the basin, stirring well. Return the custard to the saucepan and bring to boil, stirring all the time.
( 4) Sementara menanti jeli mengeras, sediakan kastard.  Masukkan tepung kastard dan gula ke dalam sebuah besen dan kacau rata dengan mencampurkan susu yang diambil daripada 570 ml susu tadi. Masak sehingga hampir mendidih susu yang selebihnya dan seterusnya campurkan susu tersebut ke dalam besen yang berisi campuran tepung kastard dan susu tadi. Kacau hingga rata dan tidak berketul-ketul.  Kemudian, kembalikan semula kesemua adunan ke dalam periuk dan masak sehingga mendidih sambil terus dikacau sehingga likat.)


5) Put a layer of custard onto the hardened jelly base.
( 5) Buat satu lapisan kastard diatas jeli yang telah keras)


 6) Whip the whipping cream until stiff peaks form or you can turn the bowl/container you whipped the whipping cream in, upside down. If the whipped cream stayed on, then it is ready. Put a layer of whipped cream on top of the custard.
( 6) Pukul 'whipping cream' sehingga kembang dan untuk pastikan yang ianya sudah sedia untuk digunakan, terbalikkan mangkuk dimana 'whipping cream' dipukul dan sekiranya ia tidak bergerak atau dalam erti kata lain 'terletak elok', ianya sudah siap.


7) Lastly, you may decorate your trifle with some colourful toppings (optional).
( 7) Akhir sekali, hiaskan strawberry trifle anda dengan 'topping' kesukaan  anda jika mahu.


Try it out and let me know, ok!!! 
(Cubalah, dan bagitau saya samada resepi ini menjadi ataupun tidak, ok!!!)

Thursday, May 19, 2011

Dessert : Cheese Tarts

A) SWEET SHORTCRUST PASTRY
(This pastry is used for egg tarts, cheese tarts, blueberry almond tarts, hazelnut tarts, fruit tartlets etc.)

Ingredients :

125 gm butter
63 gm icing sugar
250 gm all purpose flour
1 egg yolk
half teaspoon of vanilla essence
1 tbsp water

Method:

- Sift flour and sugar into mixing bowl.
- Rub butter into flour mixture until resembles coarse crumbles.
- Add in egg yolk, vanilla essence and water.
- Shape dough into ball and refrigerate before use.


B) CHEESE TARTS FILLING

Ingredients :

250 gm cream cheese (Philadelphia cream cheese)
20 gm butter
60 gm granulated sugar
1 egg

Method :
- Beat cheese, butter and sugar together till fluffy, add in egg and beat until well mixed.
- Pour mixture into baked tart shells.
- Bake at 180°C for 10 minutes.


Feel free to add blueberry jam, strawberry jam or chocolate topping.

Actual recipe taken from : http://www.bakewithyen.com/recipes/book3/book3-pg2.pdf

My verdict : Quite an easy recipe to follow, delicious and turned out perfectly every time.